![]() Prices in Canadian Dollars.
Prices in Canadian Dollars.![]() Prefer to call and speak to a floral agent? 1-877-277-4787
Prefer to call and speak to a floral agent? 1-877-277-4787

Bedding Plants from Seed
Bedding Plants from Seed
You can save yourself lots of money every year by growing your own bedding plants. Some are very easy to grow, some are more challenging, but well worth the attempt.
Seed

Start with good seed. The freshest, high quality commercial seed from a reputable seed house will indicate a percent germination figure. The seed catalogues will also have information on how to treat the seed, when to plant, transplant, light, temperature, etc. Stokes is the most informative source I have found so far. Don’t be put off by the detailed requirements, however, if your growing room is 75 F instead of 72 F as it says in the book, don’t panic, you’ll probably still get good results.
If you’re using seed you collected yourself, old seed from last year, or other unknown types, plant these a little heavier in the tray to make up for low germination rates.
Soil
This is the next most important factor. For most seeds, they will be in the seeding tray for only a short time before you transplant them out to the larger 4 or 6 packs. For this reason the soil does not need a lot of fertilizer or other nutrients. The best mix I have found is a combination of fine peat moss, sand, or perlite and no actual soil. You can get commercial potting mixes, Sunshine Mix, for instance that even have a wetting agent for the peat moss and some other useful additives.
Use this mix straight out of the bag for your first planting. Make sure you pack the soil firmly in the trays, level and smooth. Water the mix before you fill the trays, after you fill the trays and once more after you add the seed. Always add water from the bottom for newly planted seed.
For the transplants you may want to add some black soil to the commercial mix to give it some body, some more minerals, and a little more nutrients for the plants. You will have to fertilize these trays over the growing period.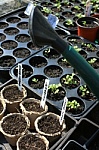
Use sterilized black soil if possible, otherwise you’ll have weeds growing in your seed trays. Heat garden loam in the oven at 350 F for about an hour to kill weed seeds, pests and disease organisms.
Trays
Start the first seeds in small trays, 6 per flat or 8 per flat, or even yogurt containers. All the trays and containers must have drainage holes in the bottom. You don’t need to add gravel to the bottom of the pot, just soil mix all the way down.
Transplant individual seedlings to 48 per tray or smaller so that you get individual plants and can transplant them into the garden without damaging the roots.
Seeding
Follow the recommendations in the seed catalogue. Sprinkle seeds sparingly over the surface. Keep in mind you want to be able to get separate seedlings out again in a few weeks. Cover the seeds with a layer of fine soil mix and tamp down firmly with another tray of the same size. You need good contact between the soil particles and the seed. Water from the bottom. Seeds that need cold treatment can be put in the fridge at this point.
Water
For tiny, delicate seedlings bottom watering will cause the least disturbance. Purists will use room temperature water rather than cold water straight from the hose.
Over watering is the most common cause of disease in bedding plants. The soil surface should not be constantly moist! Allow the soil to dry out between watering. Do not stress the plants for lack of water, wilting will slow down growth and may cause the plants to harden up, and mature too soon.
Transplanting
You will need to move the tiny seedlings from the first seeding tray to individual pots. The first leaves are cotyledons, seed leaves and not true leaves. Wait until you get 2 or more regular leaves developed until moving to the larger trays.
Use a dibble, a pencil sized stick with a rounded end (actually a dull pencil works fine) to loosen the seedlings from the bottom. Grasp the plant by the leaves, never by the stem. The tiny stems are delicate and easily crushed just from the pressure of your fingers holding on.
Make a hole with the dibble in the new soil, drop the seedling in and pack the soil up sideways around it with the dibble. You can set the seedlings a little deeper in the soil than they were before. New roots will grow out of the section of the stem that’s now under the surface.
Disease
The most common disease problem in seedlings is “damping off” caused by several fungal pathogens living at the soil surface. The fungi like a moist environment and so over watering increases this problem. The fungus attacks the seedling at the base of the stem, withering the stem, causing the plant to tip over. The symptoms include a brown or black lesion at the base of the stem. The fungus can spread rapidly to other plants in the tray and to other trays through airborne spores, water splashes and mechanical transfer on tools and hands. The initial contamination comes from spores present in all types of soil, and is ubiquitous. The only true control is to not over water!
Stress
If the plants are stressed in the seed trays, they will mature too quickly, going to Flower early and giving you short, small, not very numerous Flowers. Once the plant has started to mature it’s very difficult to reverse the process.
To avoid this problem don’t let the plants get drought stressed in the trays. Don’t let them get over heated in a hot dry location. Don’t let them get crowded in containers that are too small, or with too many plants in the same pot. Adding nitrogen fertilizer will keep the plants in the juvenile stages with softer growth, less likely to mature ahead of time. Stay away from too much potassium fertilizer.
Many garden centres will offer bedding plants already in Flower in the transplant trays. Don’t buy these, they are already too mature for such a small plant and will not be vigorous enough and large enough to be useful.
Labels
Be sure to label everything very clearly with a waterproof marker. Include species, variety, colour and date of planting, and transplanting. It’s very difficult to tell seedlings apart, especially in the early stages.
Which Plants To Start Ahead
Here’s a list of species that are easy to start ahead and should be attempted.
Annual statice – leaps out of the ground. Start 4 – 6 weeks ahead to get large vigorous transplants.
StrawFlowers – same as annual statice, very easy.
Perennials – any perennials can be seeded at home. Even if you’re late planting them, if you can get a small plant established in the garden before fall, you’ll have a healthy perennial plant going for the following year. You can leave the perennials until after the spring annuals rush.
Cuttings – many herbs belong to the mint family, look for square stems. All of these can be grown easily from cuttings and transplanted just like the seeded bedding plants. Geraniums grow best from cuttings. Watch for fungal diseases and over watering problems with un-rooted stems.
Celosia – do not stress too much.
Ornamental Corn – the only way to get mature cobs from the fancy types.
Which Plants To Direct Seed – Don’t Start Ahead
Many plants actually produce better if they’re planted directly into the ground rather than started indoors.
Larkspur – definitely needs to be direct seeded. Can be planted in fall and very early in spring.
Gourds and pumpkins – Cucurbits do not transplant well.
Celosia – may do better if direct seeded early. May need some protection from spring cold temperatures.
Poppies, Bachelor Buttons, Cosmos, Dill – anything that self sows will be good for direct seeding. May be fall planted. Grains and Grasses – ornamental grasses and field crops.
SunFlowers – can be planted sequentially from fall, early spring, to the end of July.
Nigella Basil – try this, it works. Extend the season by covering early plantings with a tunnel of double layer poly to keep spring frosts out.